With special contributions from
Pam Haskins of @44marketplace
DIY: Painting Kitchen Cabinets In 5 Easy Steps
If all this extra time spent indoors has you noticing a few household improvement projects that could use a fresh coat of paint (those kitchen cabinets, perhaps?), now is a great time to get them done! You might be wondering, can you paint kitchen cabinets? And to this, we say yes! There are some instances where you probably shouldn’t, but we’ll get to that later.
Besides the fact that we spend roughly 40% more time indoors during the winter months than in the summer, manufacturers are more likely to offer better paint deals in the late fall and winter. And trust us, the quality paint you use for a kitchen cabinet repaint is crucial to how they’ll turn out. Plus, if your cabinets are in good shape, the cost of painting them will be far less expensive than replacing them. All you need to do is throw on your paint clothes, grab your paintbrushes, pick a color, and follow these simple steps for how to paint kitchen cabinets!
Before You Paint…
Assess Your Cabinets
Before you buy all the necessary supplies for painting kitchen cabinets, be sure you should, in fact, paint them. While unfinished, painted, and stained woods are among the best cabinets to repaint, laminates aren’t. You can paint them if you’d like, but don’t be surprised if your paint job lasts just a short time. Also, stained wood and glossy finishes need to be de-glossed before they are repainted.
Choose Your Paint Type
When it comes to painting kitchen cabinets, you have multiple paint options: oil, latex and many specialty paints like chalk paint, acrylic paint, ceramic based and more. The user-friendliness and easy clean-up of latex paint along with the specialty paints make them the more popular choice among homeowners. That’s not to say oil paint doesn’t have its benefits, too! Painting pros will often say oil paint offers a harder, more durable paint film and levels out better for a smoother finish. Latex paints can also take longer (up to three weeks longer than oil) to cure. No matter which you choose, you’ll get a great finish.
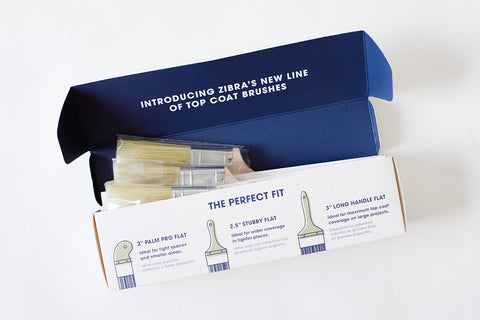
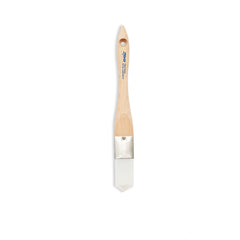
Pick the Right Brushes
Believe it or not, the secret for how to get a smooth finish when painting kitchen cabinets with brushes is picking the right ones! A triangle paintbrush is going to be your best friend for tight corners, small surfaces and raised panels, while a chiseled wedge paintbrush will take care of edging, trim and large flat cabinet surfaces. Zibra’s paintbrush kits include several paintbrushes ideal for both oil and latex paint, so you can reuse them for different projects afterward.
Empty and thoroughly clean your cabinets, this is the most important step in the process. There should be no sign of dirt, grease, or sticky food left! Remove all knobs and handles, doors and drawers. Any paint-free surfaces (hinges, countertops, appliances, etc) should be taped off, and any holes or imperfections should be filled with a wood filler and sanded smooth. All cracks and crevasses between cabinet boxes/ trim should be filled with caulk for a more finished look
2. Sand
Once your cabinets are clean and free from imperfections, you’re ready to sand. Sanding helps grab the paint for a long-lasting finish. You can use a rotary sander for flat areas and a hand sander for cabinet edges and hard-to-reach spots. For stained cabinets use 220-grit sandpaper, for painted cabinets with stipple use 120-grit sandpaper before moving to a finer paper. Ultimately, you’ll want to finish sanding with a 320-grit to help assure a smooth surface for painting. If your cabinets are really old, they may have what’s known as crocodile skin - a thick, scaly coating. For this surface, you’ll need to strip your cabinets before sanding.
3. Prime
All in one paint-and-primer might be great for walls, but not for painting kitchen cabinets. Using a primer only, paint one side of the cabinet doors, allowing them to completely dry before priming the other side. If transitioning from a dark color to a lighter one, we recommend tinting the primer to match the final color. The paint store can do this for you.
4. Paint
If your new paint is a similar shade to the existing color, you should be able to get by with two coats, possibly even one. If you’re painting over a dark finish, you’ll probably need a third coat. Cabinet boxes should be painted from the top to the bottom, applying paint across the cabinet’s grain and tipping it off with the grain. Lightly sand the surfaces with a 320-grit between coats for a smoother finish. Doors, drawers, and shelves should be painted on a flat surface to prevent drips, runs, and sags.
5. Top Coat
It’s very easy to skip this step but if you want your beautiful new kitchen cabinets to last you will want to lay down 2 to 3 coats of a water repellent top coat. There are multiple top coats available today. Check with the paint manufacturer to see what top coat they recommend with the paint you are using. You will want to consider adding an extra top coat to areas of the kitchen that get more water and cooking exposure.
Put it all together!
Once your top coat has dried and cured, you can put your cabinets back together, sit back, and enjoy your final product.
When you need answers to questions like, “Can you paint kitchen cabinets?” or, “How to get a smooth finish when painting kitchen cabinets,” or simply need the best paintbrush for kitchen cabinets, Zibra is here to help. Shop our great selection of paintbrushes today to get the best results for any DIY project!
Make sure you take time to listen to our podcast interview with Pam Haskins of 44 Marketplace, she is an expert at painting kitchen cabinets and offers great advice!
Rich charcoal gray, deep blue, and black cabinets bring a sophistication into the home kitchen. Here, we feature some of our favorites. The use of patterned tiles, the energy of living plants, the warmth of wood, and the bright marbles make these kitchens burst with style and pizazz!